¶ PPE widget integrations
This section provides information on how to integrate the PPE widget in your e-commerce website. It is mainly composed of a javascript + css module which takes a configuration.
We also created a package that includes a PPE widget React component that can be added to any React project by installing it with your package manager.
¶ Plain HTML integration
Here is an example on replit.com (a token must be added in the configuration to see the widget working)
There must be 3 elements in the HTML document for the widget to work: CSS and Javascript files and the configuration.
¶ 1. The link to the CSS file:
<link href="https://ppe.wegetfinancing.com/index.css" rel="stylesheet" />It must be added in the <head> of the document.
¶ 2. The Javascript file:
<script src="https://ppe.wegetfinancing.com/index.js"></script>It must be added just before the </body> closing tag.
¶ 3. The configuration can be added in 2 ways:
- The first way is to add it directly in the
<head>of the HTML document:
<script>
   // In case there are no config.json file the widget configuration can be added here
   const ppeConfiguration = {
     priceSelector: ".price-item", // the class name of the html element containing the prices on the page (REQUIRED) (string)
     debug: true, // if true, prints debug messages on the console (boolean)
     token: "", // Merchants need to add their WeGetFinancing's access token as a string (REQUIRED)
     branded: true, // If true, WeGetFinancing branding will be rendered (boolean)
     minAmount: 1000, // we will not show the PPE if the amount is below this number (REQUIRED) (number)
     customText: "or just", // Add any text before the monthly payment in the message under the price (string)
     hover: true, // Allows the widget to be opened not only when it is clicked but also when the mouse hovers over it. (boolean)
     fontSize: 90, // The size of the estimation message (number)
     position: "center" // Positions the estimation message. Options are "flex-start" "center" "flex-end".
   }
   window.ppeConfiguration = ppeConfiguration
 </script>
- The second way is to reference a JSON file:
<link id="wgf-estimator-config" href="config.json" />🚨 The id has to be this exact one : wgf-estimator-config
¶ Other integrations
The following integrations are mostly built on the HTML integration, but with the addition of a server. This means that unlike the plain HTML integration example on replit.com, you don't need to include your token to see the widget in action in these integration examples.
To keep your token secure, you can configure the environment variable to pass it, allowing you to keep it confidential. You can see how to do this in the follwoing replit.com examples.
¶ Node/Express integration
Here is an example on replit.com
¶ Flask integration
Here is an example on replit.com
¶ PHP integration
Here is an example on replit.com
¶ Integration of the PPE widget component package (not yet public) in a React project
Here is an example on replit.com
You can use the ppe widget package to use the component in any React project. It works like any npm package and can be added using:
npm add ppe-widget
or
yarn add ppe-widget
The PPEWidget component can then be imported in the project .jsx or .tsx files like so:
import PPEWidget from "ppe-widget";The parameters are:
price(required, number): the price of the product to be financedtoken(required, string): the merchant tokenminAmount(required, number): the minimum amount required for the financing offercustomText(optional, string): custom text to be displayed in the estimation messagebranded(optional, boolean): if the financing offer is brandedhover(optional, boolean): if the widget opens on hoverfontSize(optional, number): The size of the estimation messageposition(optional, string): the position of the widget on the page
 <PPEWidget
     price={2000}
     branded={true}
     customText="pay only"
     token="" // Add your token here
     minAmount={1000}
     hover={true}
     fontSize={90}
     position="flex-start"
/>It gives this result:

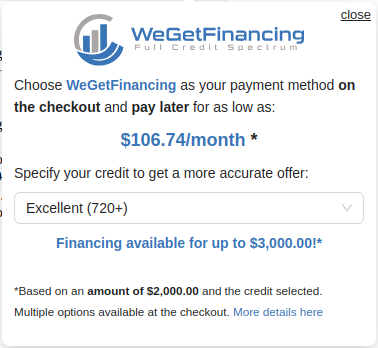
And this pops up open when Details is clicked:

¶ How to customize the font colors
To customize the default colors of the text in the widget, you need to override 3 classes as shown in this example:
/* This will update the color of the text above the select input field */
.wgf-ppe .ant-typography {
    color: red;
}

/* This will override the color of the message under the product price and of the footer section of the widget */
.wgf-ppe {
    color: red;
}

/* This will override the blue text */
.wgf-ppe .blue-text {
    color: green;
}